The principles of visual art are the rules, tools and guidelines that artists often use to organize the elements of art in their work. Of course, not everyone follows these rules but most of them does because it is more pleasing for the human eye. Let's take a look at some of these principles and a few other tips to take better shots.
The Golden Ratio and the Rule of Thirds
In mathematics and the arts two quantities are in the golden ratio if their ratio is the same as the ratio of their sum to their maximum. Many artists have proportioned their works to approximate the golden ratio-especially in the form of the golden rectangle in which the ratio of the longer side to the shorter is the golden ratio-believing this proportion to be aesthetically pleasing.
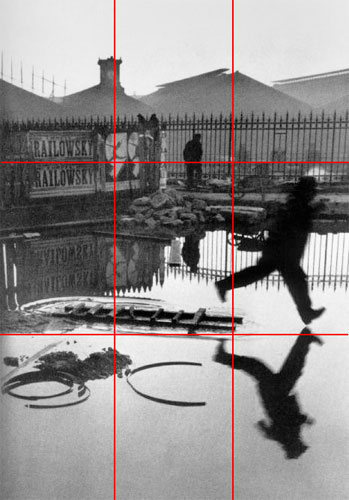
We use this ratio to draw imaginary lines on a rectangle image. The lines cut the image in 3 vertical and 3 horizontal identical parts. (red lines on the image)
If the subject is in the middle of the image it seems too static. It is always better to try to place your subject on one of these imaginary lines or intersections.
Move your subject away from the center to achieve a visual balance.
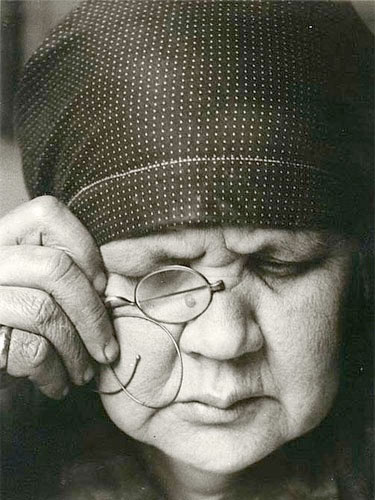
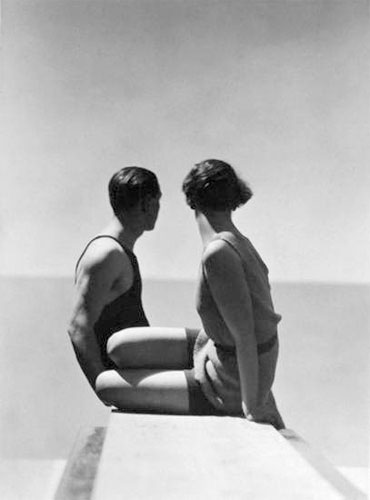
Photo © Henri Cartier Bresson Behind the Gare St. Lazare 1932
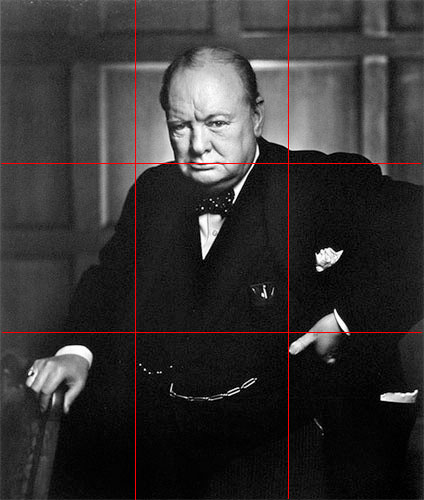
Give your subject space on the side that he is looking
For portraits do not put the eyes in the center of the image (also follow the rule of thirds) and compose your portrait so that the subject's eyes are positioned 1/3 of the way down from the top of the frame. It is better if you keep the eyes in the upper third. To help you do that try to place the neck in the center.
Also give your subject some room to look into. If the subject is looking in one direction (or if his head is pointing in one direction) it is best to place him on the opposite side of the frame.
Photo © Yousuf Karsh, Winston Churchill, 1941
Vertical or horizontal?
Spontaneously we take "landscape" images (horizontal) because the images seem more balanced and more accurate in comparison to our vision. Our eyes scan space from left to right. It is the obvious choice for landscape images and all the actions that require width.
For portraits we usually use "portrait" or vertical framing. But because a vertical framing is called "portrait" everywhere doesn't mean you have to use it when shooting portraits. Change your framing for every shoot to add variety to the type of shots you take.
Shoot vertically to enhance tall objects or to accentuate height. Shoot horizontally to accentuate width.
Use diagonals and leading lines
When we look at a photograph our eyes are naturally drawn along lines. The use of lines can help direct the viewers attention to a specific part of an image. They can be straight, diagonal or wavy, intentional or unintentional. They affect the way we view the image, dragging us towards the subject or leading us away from it. Lines should enhance your composition not the opposite.
Most of the time they start at the bottom of the frame and guide the eye upwards and inwards, from the foreground to the background of the image to guide your eyes toward the main subject. The roads are a good example of lines that can help us achieve that. They give us a feeling of motion.
A few tips about lighting
Lighting is very important and can be sometimes tricky. Here are a few quick facts to help you.
* Check where the lights come from if you want to avoid dark pictures. The sun for example should be in your back or on the side but not just in front of your lens unless you want to make a special effect.
* The broader the light source, the softer the light. The narrower the source, the harder the light.
Hard light comes from a source that's small compared to the subject. In this case it casts hard shadows and has high contrast.
Soft light falling on the subject from a source that's large compared to the subject, wraps light around the subject, filling shadows and lowering contrast.
A large source will wrap light around a small subject filling shadows and lowering contrast. A small source will direct light onto a large subject creating hard shadows and high contrast.
* Diffusion makes the light source broader and therefor softer. Think about clouds or fog. We usually use reflectors to diffuse harsh lights but you can also use a white fabric.
* Light gets dim fast when you move it away. The rule says that light falls off as the square of the distance. You can use it to vary the light of your background.
* Front lighting de-emphasizes texture but lighting from the side, above, or below emphasizes it. Which means that if you want your model for instance to have less wrinkles, keep the light close to the axis of your lens.
* Light has a temperature. Depending on the time, sunlight can be warm or bluish. You can modify the white balance of your digital camera to play with the tone of the light. If you are using film, filters are a good option.
* Shadows create volume, play with the light, try different things.
* If you don't have enough light, your subject will be blurry if it moves. Use a tripod and increase exposure time. Don't hesitate to play with shutter speed.
Pay attention to the background and depth of your image
Photography is a two-dimensional medium, so we have to choose our background carefully to convey the sense of depth.
For depth play with
* Aperture size: the smaller the size of the lens aperture (the larger the f-number), the greater the depth of field. The larger the aperture, the shallower the depth of field.
* The distance between the subject and the camera. If you move further from the subject you increase the depth of field. If you move closer to your subject you decrease it.
* Lens focal length. Zooming out to a wider angle of view increases depth of field. Zooming in on the opposite decreases it.
You can also create more depth by including objects in the foreground, middle ground or background.
Background: Sometimes you want your background to be as minimalistic as possible and sometimes you want the background to increase the context/story/drama of your image. In any case try to pay attention to your background. Many images are ruined by not paying attention to what is going on.
Importance of view point
The view point is very important, it has an impact on the composition and as a result it can modify your message.
If you shoot down on subjects you either diminish them or make them look less imposing. It is usually more flattering to shoot a person slightly below his eye-line. For example if you take a picture of a child you should bend your knees so that your camera is at the eye level of your subject otherwise he/she will appear to have a big head and small legs.
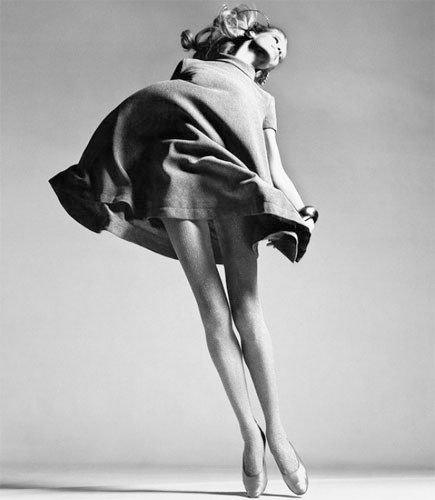
If you shoot up from ground level for example you will make your subject look more imposing. It can be a good view point for fashion shots because the model will seem to have much longer legs.
Fill the frame and frame your shots
Especially when you shoot portraits the rule is to fill the frame so that you are not distracted by the background. The image seems more powerful and intimate. Get closer to your subject or zoom in. Don't hesitate to crop your images afterwards if you have too much wasted space on the sides of your subject.
If you are shooting landscapes don't hesitate to frame your image. You can find natural frames almost everywhere like trees, archways, windows, branches, walls... By placing some of these elements around the edge of the composition you help to isolate the main subject from the rest.
The result is a more focused image which draws attention to your main subject. Of course your frame doesn't need to go completely around the edges of your image. Your frame can also be out of focus (or not) depending if your frame is in the foreground, middle or background and your choice of aperture.
KISS or keep it simple series
Less is more. Simple images tend to have more impact because the message is usually clearer and our attention more focused on what is important: the primary subject.
Rules are not laws.
Composition in photography is not a science. All the rules that you can find here and there are just tricks that might help you but it is not the recipe for success. Some photographers respect these rules while others don't. But it is always better to comprehend the basics in order to understand their properties if you want to bypass them later. We could take Picasso as an example to make our point. He studied all the classical paintings, rules, guidelines at art school and he knew very well how to draw. But it is because of his knowledge that he was able to make balanced fragmented paintings later in his life. Don't hesitate to break the rules but always keep in mind that they might help you.